I only started playing Minecraft a couple of years ago, and rage quit after I set my house on fire due to a misunderstanding of lava dynamics. It reentered my life when I saw an article on qCraft, a mod that incorporates elements of quantum physics into gameplay. From there, I discovered the amazing world of Minecraft mods, accompanied by YouTube videos and collections on imgur showing off creations.
Dramatic Lego® reenactment of the lava incident
However, once you dig into some of the more extensive modpacks, you run into the unfortunate problem of setting your actual house on fire, sparked by your overheating laptop. So, my partner-in-Minecraft and I stopped hosting the world off of our laptops and moved it onto Google Compute Engine (GCE). We weren’t running a complicated server, and our setup was even less complicated than the vanilla whitepaper detailed.
As happens to many Minecraft players, the modpack we were using was deprecated, and we were faced with once again rolling out another server. We created yet another special snowflake of a server. Setting up the world was always a bit of a hassle, and there were invariably little steps that we forgot each time. Why not use a Docker container to simplify the process instead? In this piece, I’ll walk you through using Docker to make setting up your Minecraft server on GCE easier, faster, and more repeatable.
Containers can help you out
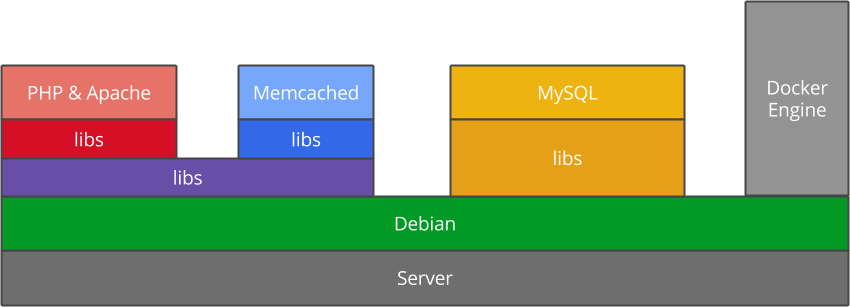
A common containerized application pattern using Docker
I elected to use containers for some of their benefits:
- Eliminate overhead and increase efficiency
- Remove the mystery of what’s going on
- Streamline the process of creating new worlds
- Make upgrading easy
Also, it’s an easy way for beginners to get some practical experience with containers.
If you’re new to containers, don’t worry if the concept doesn’t resonate at first; it requires a nontrivial shift in thinking. There are great resources out there to learn about containers, so I’ll link some of them here:
- A Gentle Introduction to Docker and All Things Containers
- A Quick Introduction to Docker
- Understanding Docker
- A Practical Introduction to Docker Containers
- An introduction to containers, Kubernetes, and the trajectory of modern cloud computing
Docker has popularized containers and provided a great way to share and build upon container images. I referenced Docker’s documentation multiple times while writing this, and I highly recommend that you familiarize yourself with the core concepts.
Prerequisites
The steps to follow along assume that you have a Google Cloud Platform account with GCE enabled, and a passing familiarity with the command line. If you don’t have an account, there’s a free trial!
Installing or enabling Docker
You’ll need to use Docker to create your Minecraft container, and that means installing it locally or using something like a container-optimized image on a virtual machine for your development environment. I prefer to go with the latter option, because Docker on a mac still requires the use of Boot2Docker and VirtualBox, so why not use a VM?
We’ll assume that you’re following along with a container-vm from here on out.
Installing and configuring gcloud
gcloud is how you interact with Google Cloud Platform from the command line. Run from the command line to install:
local $ curl https://sdk.cloud.google.com | bash
and restart your shell.
Next, you need to tell gcloud which project to use:
local $ gcloud auth login --project <project id>
and follow along with the prompts.
Start and configure your container VM
Creating a container virtual machine must be done using gcloud, so we’ll ask gcloud to create an instance named minecraft-docker using one of the container-optimized images, with read/write access to Google Cloud Storage (GCS). We don’t need a large image for our development environment, so we’ll use a micro-instance:
local $ gcloud compute instances create minecraft-docker \
               --image container-vm \
               --zone  us-central1-f \
               --machine-type f1-micro
               --scopes storage-rw
After it boots up, go ahead and ssh into it (you may also do this in your browser, from the developers console):
local $ gcloud compute ssh minecraft-docker --zone us-central1-f
We’ll need to do a couple of things to round out our container VM. Optionally, you may want to install your preferred editor, if needed (it already has VI installed). The second is to update gcloud, as it updates more frequently than the images are built:
minecraft-docker $ sudo gcloud components update
You can verify that docker is running (without you having to do anything!) by running:
minecraft-docker $ sudo docker ps
Now we’re ready nail down the specifics of our container.
Writing the Dockerfile

Feed the Beast Infinity loading screen
Docker builds images by following instructions in a Dockerfile. We’ll start by making our Dockerfile set up the Minecraft prerequisites. Create a file called Dockerfile and add the following lines:
FROM debian:7.8
MAINTAINER Jane Doe <jane@test.com>
The first line tells Docker upon what image it should base this image, and the second is who is on the hook to maintain it. Don’t saddle Jane with maintaining your image: replace that line with your information.
Next, we’ll need to make sure some software is included wherever we decide to run our Minecraft server:
RUN apt-get update && apt-get install -y \
    curl \
    openjdk-7-jre \
    unzip
We’ll need to be able to fetch some files, Java 7, and some utilities. That’s the bare minimum of what we need for our server. Now we get into some Minecraft-specific parts. We’ll be running a Feed the Beast (FTB) Infinity server, and right now it’s on version 1.6.2. Let’s add an environment variable for that, for what port we want the server to run on, and a couple for the location of the modpack:
ENV FTB_VERSION 1_6_2
ENV PORT 25565
ENV BASE_URL http://ftb.cursecdn.com/FTB2/modpacks/FTBInfinity
ENV SERVER_FILE FTBInfinityServer.zip
However, we need a way to tell the container that we accept the EULA. Thanks to this tip, we can use environment variables to do it, but we need a couple tweaks. Let’s create our default directory and add a script that checks the environment variable that sets the eula.txt based upon that:
RUN mkdir /opt/ftb
WORKDIR /opt/ftb
COPY CheckEula.sh /opt/ftb/
We’re ready to grab the files and extract the FTB server:
RUN curl $BASE_URL/$FTB_VERSION/$SERVER_FILE -o ftb.zip && \
    unzip ftb.zip && \
    chmod u+x FTBInstall.sh ServerStart.sh CheckEula.sh && \
    rm eula.txt
Then, we need to insert CheckEula.sh’s execution into the server startup script. You can do this in any number of ways, but hacking it up with sed is easy enough for our purposes:
RUN sed -i '2i /bin/bash /opt/ftb/CheckEula.sh' /opt/ftb/ServerStart.sh
For the finishing touches, we run the install script, register the server port, and tell Docker to start the server (and thereby checking the eula) when we run the container:
RUN /opt/ftb/FTBInstall.sh
EXPOSE ${PORT}
CMD /opt/ftb/ServerStart.sh
You can see the full file on GitHub.
Building and pushing your image
This is all just in a file at the moment though; we haven’t actually installed Java or Feed the Beast on our virtual machine. Let’s change that and build our image. In the directory with the Dockerfile, run:
minecraft-docker $ sudo docker build -t <docker user>/ftb .
Because we’re going to run our server on GCE, we can take advantage of the Google backbone by using the Google Container Registry (GCR). Along with giving us a finer-grained permission model, this will reduce the time it takes for our server to get up and running. First, we need to tag our image:
minecraft-docker $ sudo docker tag <docker user>/ftb gcr.io/<your project id>/ftb
Then, we’ll push it to the GCR (this will take some time to complete):
minecraft-docker $ sudo gcloud docker push gcr.io/<your project id>/ftb
Opening up a port
While we’ve exposed a port for our Minecraft container to run on, that doesn’t quite do the trick. Our Minecraft client still won’t be able to connect to it. What we need to do is also open up that port on the GCE instance. You can do this from the console, or from the command line using gcloud:
local $ gcloud compute firewall-rules create minecraft-port \
               --description "Allow connecting over port 25565" \
               --allow tcp:25565
Running the container
We are almost all set; all that’s left to do is actually run the Minecraft server! Because we have already containerized it, all that we need to do is create a container-optimized GCE instance, pull and start the container:
local $ gcloud compute instances create minecraft-server \
               --image container-vm \
               --zone us-central1-f \
               --machine-type n1-standard-1 \
               --scopes storage-rw
Now, ssh into the machine and update `gcloud`:
local $ gcloud compute ssh minecraft-server
minecraft-server $ sudo gcloud components update
Get the image, and run the container. The -e EULA=TRUE indicates your acceptance of the EULA, the `p 25565:25565` maps the container port to the host port, and the -d means that you want to run this container in the background:
minecraft-server $ sudo gcloud docker pull gcr.io/<your project id>/ftb
minecraft-server $ sudo docker run -p 25565:25565 \
                                   -e EULA=true \
                                   -d gcr.io/<your project id>/ftb
If all goes well, after a few minutes your server will be up and running.
Playing Minecraft
Now, all you need to do is get the IP of the instance either through the console, or from the command line:
local $ gcloud compute instances list
NAME             ZONE           ...    INTERNAL_IP    EXTERNAL_IP     STATUS
minecraft-server us-central1-f  ...    10.240.168.209 130.211.176.162 RUNNING
Once you’ve created and started the Minecraft client (make sure to use the same modpack that you specified in the Dockerfile), you’ll enter <external IP>:<port> as the server address in the Minecraft client.
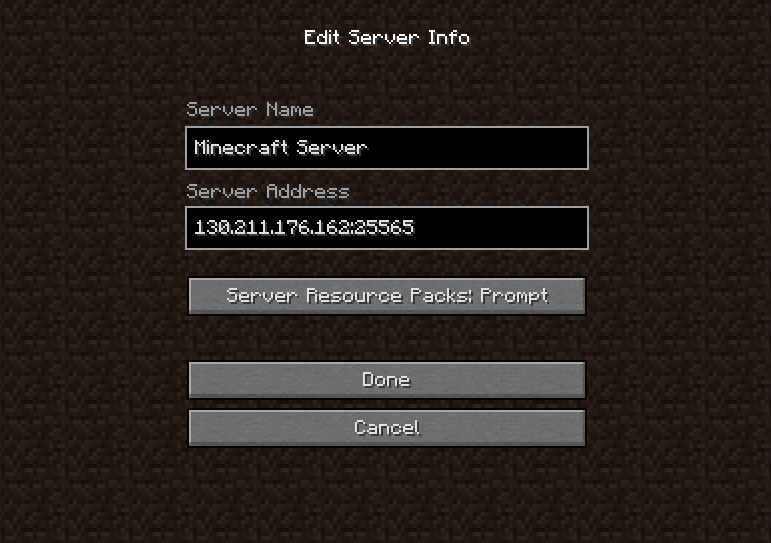
Client-side server configuration screenshot
Next time
A critical missing part from our server is storage. The server will run, and even save state when you stop the container. However, if you remove the container and start a new one, any progress you made will be lost – even if you’re using the same image! The image provides the starting point, not a record of what you’ve done after using it. That’s clearly not what we want; if the server goes away, we want to save the world.
There are any number of other issues we didn’t address in this walkthrough, such as:
- Customizing the server: easily configure the
server.propertiesfile - Saving the world: regularly create backups of your world
- Upgrading the server: make the transition to a newer version of the modpack
- Play lists: lock down who can join your server
In the next post in this series, I’ll step through a few of them.
You can see the files we used in this blog entry on GitHub.