This is Part II in a series on running a Minecraft server in a container on Google Cloud Platform. If you missed Part I, make sure to glance over it for context.
Last time
Last time, you took an existing application (a modded Minecraft server) and containerized it, using the Debian base image. You used a Google Cloud Platform container-optimized image to build our image and run the resulting container on Google Compute Engine (GCE). Along the way, you learned how to use docker run, you got familiar with the functionality and syntax of the Dockerfile, and learned how to pass and use environment variables with Docker containers.
Persistent storage
However, a major drawback of our setup was the lack of persistence: if the container went away, so would all of our progress in our Minecraft world. As serious Minecrafters know, the loss of even a few hours can set you back days. Containers are generally thought of and treated as ephemeral – that is, containers based off of the same image can be instantiated or brought down without impact to the overall functionality of the application. They’re separated from the data, and therefore interchangeable.
Our last setup didn’t achieve that ephemerality. While you could start and stop the container, the data would not survive a deletion. You need a way for our world, which is simply a collection of files, to outlive the life of the container. To do that, you’ll use a combination of persistent disks and Docker volumes.
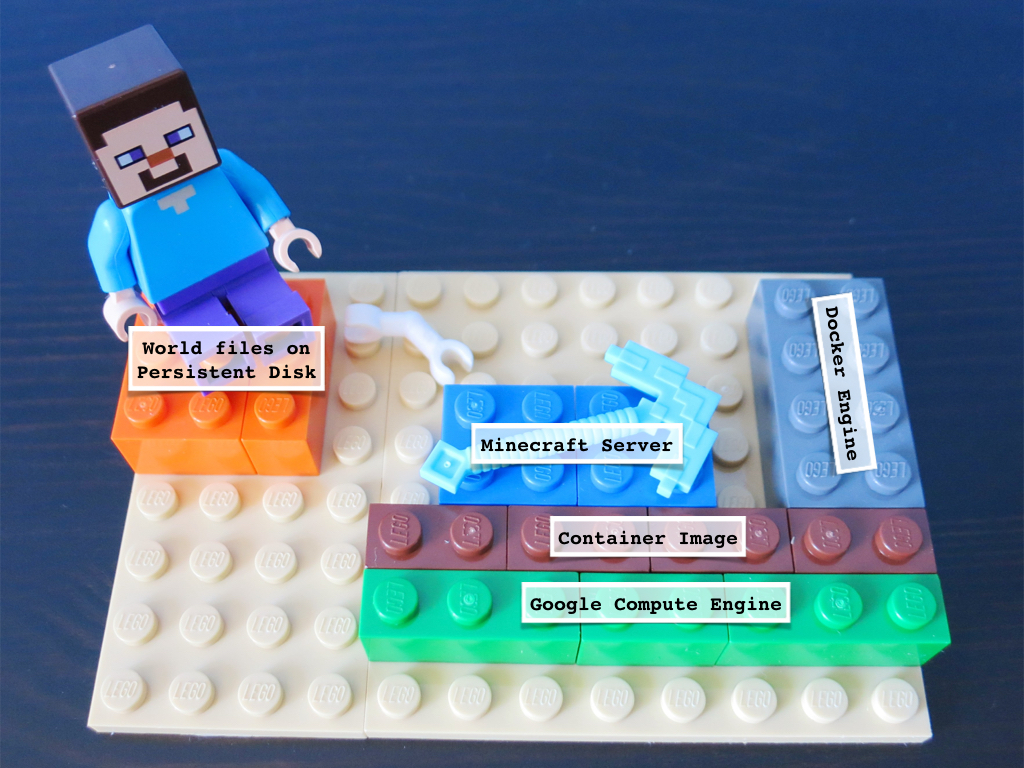
Lego® overview of the Minecraft server
Saving the world
Prerequisites
Setup for this walkthrough is the same as last time. You’ll be using a container-optimized virtual machine for development, and modifying the same Dockerfile that you started previously. This assumes that you haven’t deleted any of the resources that you created, but that your Minecraft server isn’t currently running.
Creating, attaching, and formatting the persistent disk
First off, you need a place to store our world. In the previous post, you were saving the world locally within the container (and ergo on the same virtual machine). You’re going to change that by moving our save location to a persistent disk (PD). If you explore in the developers console, you’ll see that you already have one or more disks from the creation of your development environment and server. These disks are rather small (approximately 10 GB) and act as boot disks for the virtual machines. Our PD has a different purpose; its primary job will be as data storage.
Create a persistent disk called minecraft-world-disk1 using gcloud:
local $ gcloud compute disks create minecraft-world-disk1 --zone us-central1-f
You can check on the status of all your persistent disks by listing them:
local $ gcloud compute disks list
Once the disk is running, you can go ahead and attach it to your server (remember, our server is a virtual machine called minecraft-server):
local $ gcloud compute instances attach-disk minecraft-server \
                       --disk minecraft-world-disk1 \
                       --device-name minecraft-world-disk1 \
                       --zone us-central1-f
If you’re having issues attaching the persistent disk to the virtual machine, make sure that they are in the same zone.
Go ahead and ssh into minecraft-server (our server host).
In order to use our persistent disk, you need to format and mount it. You can see the disks attached to the instance by running ls -l /dev/disk/by-id/google-* on the instance itself. First, you’ll create a mount point. Then, you’ll use the tool (provided by GCE) to prepare the disk:
minecraft-server $ sudo mkdir -p /minecraft-world
minecraft-server $ sudo /usr/share/google/safe_format_and_mount \
                            -m "mkfs.ext4 -F" \
                            /dev/disk/by-id/google-minecraft-world-disk1 \
                            /minecraft-world
Using Docker data volumes
Now that you have a reliable place to save our world, how do you go about telling our containerized Minecraft server to use it? Docker has what they call data volumes, which give applications a place to store information (in our case, the Minecraft world). Important notes about data volumes:
- data volumes, and their data, outlive the life of a container
- you may use one data volume with more than one container
- updates to a container do not reflect updates to the data volume
If you think of these notes in terms of our server, they make sense: if the container gets shut down or deleted, you should be able to start up a new container and use the same world; if you wanted to run analytics on the world, you could do so in another container with the same data volume being used by the server; the server shouldn’t have any information about the world, so even if you update the image with a new version of the modpack, it shouldn’t include changes to the world.
Because you’re using a persistent disk as the location for our world, you need to specify the mapping of host directory to the data volume when you call docker run:
minecraft-server $ sudo docker run -p 25565:25565 \
                                   -v /minecraft-world:/opt/ftb/world \
                                   -e EULA=true -d gcr.io/<your project id>/ftb
Just like last time, once the server has started, you can connect to it using the Minecraft client. Once you’ve poked around a little and made some changes, let’s head back to minecraft-server and take a look at the persistent disk:
minecraft-server $ ls -alh /minecraft-world
total 256K
drwxr-xr-x 29 root root 4.0K Jul 27 18:08 .
drwxr-xr-x 24 root root 4.0K Jul 27 18:10 ..
drwxr-xr-x  4 root root 4.0K Jul 23 22:34 AE2
drwxr-xr-x  2 root root 4.0K Jul 23 22:37 aroma1997
drwxr-xr-x  2 root root 4.0K Jul 23 22:37 chickenchunks
drwxr-xr-x  2 root root 4.0K Jul 23 22:37 cofh
drwxr-xr-x  2 root root 4.0K Jul 23 22:38 data
drwxr-xr-x  4 root root 4.0K Jul 23 22:37 DIM1
drwxr-xr-x  4 root root 4.0K Jul 23 22:38 DIM-1
drwxr-xr-x  4 root root 4.0K Jul 23 22:37 DIM-100
drwxr-xr-x  5 root root 4.0K Jul 23 22:38 DIM-112
drwxr-xr-x  4 root root 4.0K Jul 23 22:37 DIM-19
drwxr-xr-x  4 root root 4.0K Jul 23 22:38 DIM34
<snip!>
That’s your world, stored on the persistent disk, accessible outside of the container. If you ever need to reroll your server, you can use this same persistent disk in exactly the same way and not lose any progress in-game.
But don’t take my word for it; test it out!
Test it out
Try shutting down and removing the container, and relaunching it:
minecraft-server $ sudo docker ps
CONTAINER ID  IMAGE              COMMAND                <snip!>   NAMES
3f79cfff79dc  gcr.io//ftb:latest "/bin/sh -c /opt/ftb   <snip!>   modest_euclid
minecraft-server $ sudo docker stop modest_euclid
minecraft-server $ sudo docker rm modest_euclid
minecraft-server $ sudo docker run -p 25565:25565 \
                                   -v /minecraft-world:/opt/ftb/world \
                                   -e EULA=true \
                                   -d gcr.io/<your project id>/ftb
If you run another sudo docker ps, you’ll see that this container has a different identifier than the last one. However, when you join the server, you should see that the world is in the same state as you left it in the previous container.
Mounting a disk with data
Now that you have a reliable disk with data on it, you may be asking what happens if you need to recreate or create a new instance. If you attach the disk with world information using the steps above, you’ll find that the disk has been wiped clean during the format and mount step. That’s definitely not what you want! In this case, you’ll want to skip the format step:
minecraft-server $ sudo mkdir -p /minecraft-world
minecraft-server $ sudo mount /dev/disk/by-id/google-minecraft-world-disk1 \
                              /minecraft-world
Data-only containers
A pattern that we didn’t explore is using what Docker calls a data volume container or data-only container. This is a container who’s only purpose is to host data for one or more containers. There are scenarios in which a data volume container is a smart idea, for instance when the data should outlive not only the container but the host as well.
Backing up the world
Now that you have our world stored on a persistent disk, what’s next? You likely want to keep periodic snapshots of your world so that in case you get your world into a bad state (or burn down your house), you can restore it to a previous known good state. You can do this with persistent disk snapshots either through the developer console or using gcloud.
Manually creating snapshots
You can manually snapshot the word like so:
minecraft-server $ sudo docker stop <container ID>
minecraft-server $ sudo sync
minecraft-server $ sudo fsfreeze -f /minecraft-world
minecraft-server $ sudo gcloud compute disks snapshot minecraft-world-disk1 \
                                       --snapshot-name \
                                       "minecraft-world-disk1-`date +%m-%d-%y`"
minecraft-server $ sudo fsfreeze -u /minecraft-world
Except if you’re using the same virtual machine that you created last time, you’ll get a insufficient permission error. That’s because when you created the VM, you gave it read-write access over Google Cloud Storage, but not over Google Compute Engine. (As an aside, it’s best practice to create resources with as few permissions as possible.) To work around this, you have a few of options:
Recreate the instance with the additional
compute-rwscope (recommended):$ gcloud compute instances create minecraft-server \ --image container-vm \ --zone us-central1-f \ --machine-type n1-standard-1 \ --scopes storage-rw,**compute-rw**Execute the
gcloud compute disks snapshotcommand on your local machineCreating the snapshot from the developers console
Using an additional service account with the correct scope (discouraged)
For the rest of the entry, I assume that you went with the first option, and have pulled down the container image as you did previously.
Regularly creating backups
It may be that you’re happy with creating snapshots on an “as-needed” basis. Indeed, that’s how I’ve been backing up my server. However, if you want a regular backup, it’s easy to script it. Once you have that script (and make it executable), let’s set it up to run every day at 4am.
minecraft-server $ crontab -e
Add this line to the bottom of the file (make sure to adjust for time zone):
00 04 * * * /<path to backup script>/backup-world.sh
Now, every day at 4am (UTC), the script will stop the container and take a snapshot of the world before starting it up again.
There are other ways to back up your server, so do your research and choose the one that’s right for you. You could also use Docker tooling to accomplish the same goal. But as you can see, you can create regular save points with relatively little effort using tools that are already on your server.
(Optional) Restoring the world
If you need to restore from a snapshot, create a new persistent disk with the snapshot as its source:
local $ gcloud compute disks create minecraft-world-restored \
                       --source-snapshot=<snapshot name> \
                       --zone us-central1-f
Then, attach it to your instance using the same device-name:
local $ gcloud compute instances attach-disk minecraft-server \
                       --disk minecraft-world-restored \
                       --device-name minecraft-world-disk1 \
                       --zone us-central1-f
You can treat the restored disk exactly the same as you did the old one.
Next time
You now have a fully functional Minecraft server, complete with a Lava Recovery Plan using persistent disks and data volumes. Data volumes may take a few runs through the documentation to understand what’s doing what under which conditions, but when you see it working it seems rather magical. While you’re using both as part of a Minecraft server, you can think of it as a placeholder for any number of applications.
I had intended to cover more, but there was such a wealth of information relating to configuring a comprehensive storage solution. Unfortunately this means that I had to drop the sections on upgrading, customizing, and securing your server. I’ll try to sneak in a short entry about that, but it may wind up living in my newly minted tips ’n tricks repository.
What’s next for our containerized Minecraft server? Adding Kubernetes into the mix! Let’s see what kind of mischief we can get up to with the container orchestrator.
You can see the files used in this blog entry on GitHub.